

1. Sort the slots according to the typical sizes.
2. Put the slots on to the even surface according to the installation manual.
3. Check all the slot geometric parameters (length, width, height, angles and others).
4. Turn the slots upside down in order to level off the slot flanges against the floor (the floor should be level!).
5. Interconnecting end profiles are connected to each other (not longer than 10 meters for the possibility of turning interconnected areas).
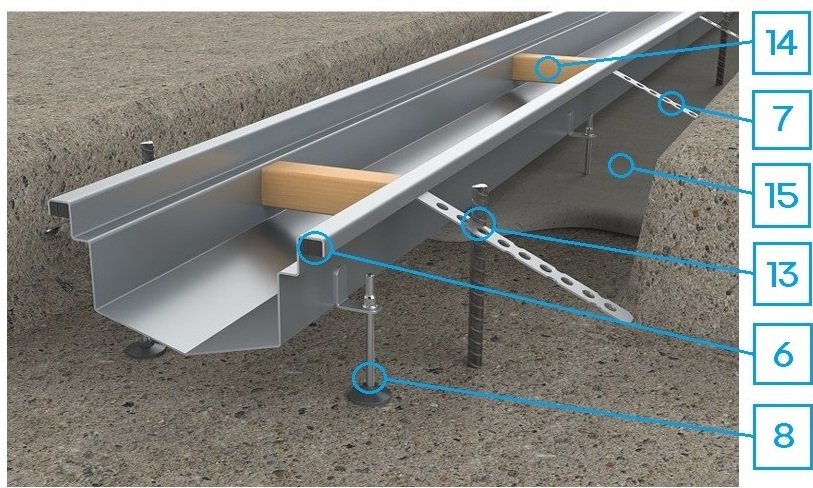
6. Fill the slot flange with the material (solution, polymer material, metal) depending on the intended load.
7. Weld slot joints on both sides of the slot, two pieces symmetrically, with the space of a linear meter in between.
8. Install adjustable levelling feet (provided).
9. Turn welded sections to proceed with installation on the levelling feet.
10. Slot joints should be welded from the inside avoiding drop-through welding to ensure hermetic sealing (IMPORTANT!).
11. Sections up to 10 meters are levelled with other large sections using adjustable feet and are bolted into one system.
12. The height of the slots is adjusted to floor pouring and levelling plan.
13. To avoid slot shift it is necessary to fix slots to the foundation. Here are some possible options:
2. Put the slots on to the even surface according to the installation manual.
3. Check all the slot geometric parameters (length, width, height, angles and others).
4. Turn the slots upside down in order to level off the slot flanges against the floor (the floor should be level!).
5. Interconnecting end profiles are connected to each other (not longer than 10 meters for the possibility of turning interconnected areas).
6. Fill the slot flange with the material (solution, polymer material, metal) depending on the intended load.
7. Weld slot joints on both sides of the slot, two pieces symmetrically, with the space of a linear meter in between.
8. Install adjustable levelling feet (provided).
9. Turn welded sections to proceed with installation on the levelling feet.
10. Slot joints should be welded from the inside avoiding drop-through welding to ensure hermetic sealing (IMPORTANT!).
11. Sections up to 10 meters are levelled with other large sections using adjustable feet and are bolted into one system.
12. The height of the slots is adjusted to floor pouring and levelling plan.
13. To avoid slot shift it is necessary to fix slots to the foundation. Here are some possible options:
- Selective levelling feet concrete pouring;
- Fixing the slot to a vertical reinforcement.
14. Before concrete pouring slots need to be braced to prevent channel walls deflecting inwards from concrete pressure.
15. Gradually pour concrete in several steps with small intervals.
16. Complete floor levelling.